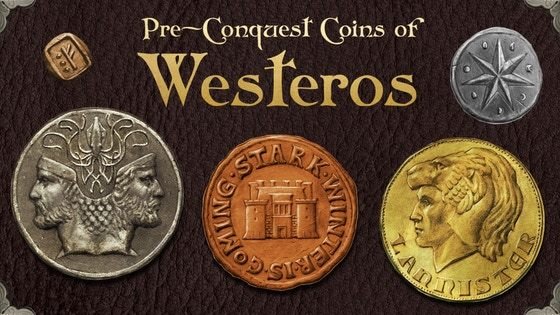
Official metal coins presented in a Coin Map of Westeros, licensed by George R. R. Martin, the author of A Song of Ice and Fire
Latest Updates from Our Project:
All packages are shipped!
over 6 years ago
– Tue, Dec 10, 2019 at 11:33:23 PM
Shipping is done!
*Whew* that was a wild ride.
As some of you have already seen, the final packages are shipped. These should arrive within a few days, even for the international backers thanks to lighting fast DHL ship times. Thank you so much for your patience. Lord of Westeros backers, I will be reaching out to you individually today, so keep an eye on your email.
Brett assembling the Lord of Westeros Coin Map
Brett and Shea assembling the Lord of Westeros Coin Map
Brett testing the assembled Coin Map with light panel
Lord of Westeros Coin Map (with light panel on)
Lord of Westeros Coin Map (glowing)
Peggy and Andrew packing the Lord of Westeros Coin Maps
Wrap-up:
Speaking personally (Helen here), this campaign has been both an emotionally invigorating and draining process. I wanted for Shire Post Mint to dive into a new process that we hadn't explored yet (making coin maps) and to make our release of coins something really conceptually concise and special as a whole. We had been talking for years about some kind of an ASOIAF display with multiple coins. The coin map idea + a set of Pre-Conquest coins made the whole project click in my head and gave plenty of room for future projects to build on that. However, this turned out to be our largest project yet and it made for a really quite large amount of work, both with the engraving (21 coin dies) and with the coin maps (stickers, wood cut, and glowing resin versions). I hope that our vision came across and I want to apologize for the delays and any lack of communication during the campaign. I know it is common for many Kickstarter projects to be delayed, but it is uncommon for Shire Post Mint's projects and it is something that will not be repeated. In future projects, I will strive for clarity, openness and better timelines that reflect our sometimes unpredictable production schedules. I realize now that I simply had no idea how much time and people we would need to complete this project. We have hired our 8th employee (wahoo!) and hope to expand into a new shop building by the end of 2020, so we aren't slowing down!
We have learned a lot over the past year! Thank you again for your patience as you allowed us to explore, innovate, and create these new objects.
Here's a short list of some things we didn't know before this project:
How to convert line drawings into laser-cuttable SVG files
Just how much the diameter of our coins varies per coin thanks to being broadstruck
How to design, cut, and assemble a frame that holds a light panel
Techniques for painting trees, mountains, and snow
Budget more time than you think you need! No, seriously!
Here's all the things we learned just about resin:
How to mix resin
How to mix glow powder into resin
How to torch bubbles off of resin surfaces
How much resin loves to soak into wood
What colors of glow powder + sand glow the best
Thank you all,
Helen Maringer, CEO, Shire Post Mint
Lord of Westeros Map Production: Part 2
over 6 years ago
– Sat, Nov 02, 2019 at 02:07:03 AM
Nearing the finish line!
Just a quick update today. All of the Lord of Westeros maps have been colored and coins have been sealed in. We found out that the wood soaks up a lot of the top coat of clear resin, so we decided to give the entire map a really thick coat for even shine. This also gives the coins a nice vivid look (like how things look darker and more saturated when they are covered in water). We have to do some last-minute minting. We need a few extra Kickstarter-exclusive coins to provide the Lord of Westeros backers with extras. All of the remaining Kickstarter-exclusive coins that we end up with will be evenly divided between Lord of Westeros backers. So those backers will end up getting more extras than expected :)
All of the other non-map rewards are ready to go, so we are just waiting on those coins and the final top coats to cure!
Adding the water and ice resin to the final maps. We flood the rivers to fill them up and then we wipe off the excess. The top coat of clear resin after this step takes care of any shine or texture differences that you see here.
Thanks!
-Helen, Shire Post Mint
Lord of Westeros Map Production: Part 1
over 6 years ago
– Wed, Oct 16, 2019 at 06:18:19 PM
Production Update: We're almost there!!!
Due to curing times, we still have a few days left for production, but we are so close! We have started production of all resin maps and will be completing resin pouring and assembly in batches of 5. There were a few aspects of production that took way more time than we expected, but we have conquered those and we're on to the fun part: putting it all together! We are confident that we will have all of these Lord of Westeros Maps shipped or ready to ship by the next update.
These maps are going to be AMAZING
We have put a ridiculous amount of hours into all aspects of this map. We are bummed that it has taken so long to finish, but we hope that the final product can show that our attention to detail has paid off. We have spent hundreds of hours:
Redesigning the mountains and trees to be better for hand-painting,
Designing a new border to look great with 18k gold paint and will successfully hide the light box,
Designing a framing system that can allow use with or without the light box,
Designing an acrylic jig that fits into the "water" areas of the map, allowing us to place items islands and coin rings correctly and consistently in the step below (it works kind of like the game Operation but backwards and with less loud noises),
PAINTING! So so so much painting. At least 3 hours of hand-painting for each map,
Gluing tiny .999 silver slugs into place to represent location makers of 7 major cities,
Testing various types of resin, resin mixing techniques, and glow powders to get the best color, water texture, and hardness,
Cutting out each individual island, organizing them by area, numbering them, creating a handy numbered reference image, removing backing paper on each island to reduce visibility of laser burn marks.
Resin gluing: Step 1!
We are using a thin layer of clear resin (applied with a printmaking brayer) to hold all of the elements in place: Border, landmass, over 25 islands placed with tweezers, 15 coin rings, and the wooden banners signed by George R. R. Martin. We have about an hour to work with the resin and place all elements before it begins to cure, so we decided that batches of 5 maps was reasonable. This video is 50 minutes worth of work by 4 people:
Islands grouped by location in individual plates and bowls so multiple people can place islands simultaneously
Bear Island put in place using the acrylic island jig
Nails heated to be embedded into the acrylic jig. These will lift the jig just enough so it won't get stuck in the resin, but still guides each island into place
Placing the island Skagos
Woody applying clear resin to a sheet of acrylic to act as glue with a printmaking brayer
Coin rings and islands in place!
What's next?
The most satisfying part. The colored resin pour. We'll mix together clear resin, white glow powder (for the icy northern waters), blue glow powder, and aqua glow power. That will be poured into the main sea areas and delicately poured into the rivers with a syringe. The blue resin will not seep into the coin rings since we were able to seal those with resin in Step 1. We'll mix some resin with even more glow powder and swirl that saturated resin throughout the waters. It might not look very different in normal light, but when backlit and potentially when glowing, you'll be able to see a mix of textures and fluid patterns. We've tried this a few times and we LOVE the effect.
Pre-Conquest Coins for sale
After the final Kickstarter reward is out for delivery, we will turn to listing all available coins on our website, shirepost.com. Those will be available with plenty of time for holiday delivery. We won't have Kickstarter Exclusive coins, obviously, but we will have pretty much everything else available.
Thanks for your support!
-Shire Post Mint
Painting, Painting, Painting!
over 6 years ago
– Thu, Oct 03, 2019 at 11:25:38 PM
Lord of Westeros Map Progress
Hey there backers! We're currently working on hand-painting all of the Lord of Westeros maps to send out, and next week we'll start pouring resin into these maps. We believe that within 2 weeks, we'll have all of these maps ready to ship out to you. It's almost finished!! Can you believe it?? We haven't timed the whole process yet, but each map takes over 2 hours in hand-painting alone to paint the mountains, trees, and 18k gold border. Check out some progress photos:
Brett painting each tree by hand
In process shot of darkened text and painted trees. These trees will get yellow sunset highlights.
Peggy adding snowcaps to the mountains and trees in the North
Detail of the mountain transition from Dorne with sunset highlights
Cutting a jig to help place islands and coin rings accurately on every map
Thank you so much for all of your support!!
- The Shire Post Team
Almost there, Lords of Westeros!
over 6 years ago
– Fri, Sep 20, 2019 at 02:05:56 AM
Here with another update, backers!
Progress has been made and we're very close to finalizing the methods we'll use to hand-craft the maps! With this version being made up of so many free-floating pieces, getting placement consistent and perfect is the name of the game.
We've tested out placing each cluster of islands by hand and are working to create a jig that will aid us in consistently placing the islands. Getting Resin to flow into rivers and inlets without over-pouring proved tricky at first but we've figured that out as well!
Dragon painting tests. Testing how the wood reacts if resin is over-poured and sanded.
One of the new silver location markers embedded into the map-- also improvements on allowing the resin to flow fully into the rivers and inlets.
We're really happy with the hand-painted trees and mountains that vary in color by location from north to south!
Overview of the most recent prototype.
We've been doing back-light tests behind the scenes and are working to ensure that the presentation is spectacular! The wooden circles that will hold each coin are having their diameters and tolerances run through for a final check so that everything fits just right.